Basic Configurations
This section is about some basic, useful configurations of the RPi.
SSH Access
When the RPi boots, being connected via Ethernet cable to a router, it shows at the end of the boot output the IP address under which it is connected. Alternatively, for example, using your admin access to your router, identify the IP address under which the RPi is connected. Then using another computer connected to the local network, open the shell and ssh to the RPi as follows:
ssh pi@192.168.178.xx
Here, replace the IP address that applies for you. After you are prompted for it, type in the password raspberry. You should now be connected with the RPi.
Fixed IP Address
A fixed IP address for the RPi is helpful for a number of reasons. I have configured the router such that the RPi always gets the same IP address, say 192.168.178.xx. For the RPi type the following to edit the respective settings:
sudo nano /etc/network/interfaces
Replace the following line:
iface eth0 inet dhcp
by these lines:
iface eth0 inet static
address 192.168.178.xx
netmask 255.255.255.0
gateway 192.168.178.1
Exit the editor with ctrl+x saving the changes. Finally, restart the network service by:
sudo /etc/init.d/networking restart
Henceforth, the RPi should be reachable under 192.168.178.xx.
Public IP Address
Using a service like http://whatismyipaddress.com/, you can figure out what your public router IP address is (depending on your router this might change regularly; modern ones at least keep their addresses until the next re-boot).
Say, you have figured out that the address is xx.yy.zz.100. Configuring your router to make the IP address of your RPi 192.168.178.xx an “exposed host”, should enable you to access the RPi from anywhere via:
ssh pi@xx.yy.zz.100
Knowing your public IP, you can also set an A record (cf. http://support.dnsimple.com/articles/a-record/) of one of your domains to access the RPi, like http://rpi.mydomain.net (which should have an A record equal to the public IP xx.yy.zz.100).
Using Public Keys
Connecting to the RPi via ssh generally asks for a password. However, you can also generate RSA keys and copy the public key to the RPi which then allows you the ssh to the RPi without typing your password again and again (when using the same machine and/or keys). Generate keys (if you haven’t yet) via:
ssh-keygen -t rsa
Then copy the public key via (Linux):
ssh-copy-id pi@192.168.178.xx
On the Mac see, for example, https://github.com/beautifulcode/ssh-copy-id-for-OSX.
Enlarging the Swap Capacity
The typical RPi comes with 512 MB of memory only. This might not be enough in certain scenarios. One way to increase the memory (if only virtually) is to work with a larger than normal swap partition. The following steps generate a 1 GB swap partition for the RPi.
First, make a swap directory and swap file:
sudo mkdir /media/swap
sudo dd if=/dev/zero of=/media/swap/swapfile.img bs=1024 count=1M
Second, generate the swap filesystem:
sudo mkswap /media/swap/swapfile.img
Third, edit the following file:
sudo nano /etc/fstab
Add this line to that file:
/media/swap/swapfile.img swap swap sw 0 0
Fourth, activate the swap file:
sudo swapon /media/swap/swapfile.img
Finally, you can check whether the new swap configuration is indeed active—either via htop or as follws:
pi@rpi ~ $ cat /proc/swaps
Filename                                Type            Size    Used    Priority
/var/swap                               file            102396  6064    -1
/media/swap/swapfile.img                file            1048572 0       -2
pi@rpi ~ $
Other Useful Stuff
This section provides a collection of other useful tools to work with the RPi (and other Linux/Debian-based servers).
Session Management with Screen
A really helpful tool when working via ssh access is Screen (cf. http://ss64.com/bash/screen.html). It allows you to have multiple shells running at the same time, to disconnect from them and later reconnect. Install it via:
sudo apt-get install screen
To start it, type:
screen
A new shell is created by ctrl+a then c. You switch to the next shell with ctrl+a and then n (more commands are found under the above link).
Later when you reconnect via ssh to the RPi you can reattach to your Screen session via:
screen -r
System Monitoring with htop
Of course, there a many useful tools available in the Linux/RPi world. One you should install as well is htop (cf. http://manpages.ubuntu.com/manpages/oneiric/man1/htop.1.html)
You can install it via:
sudo apt-get install htop
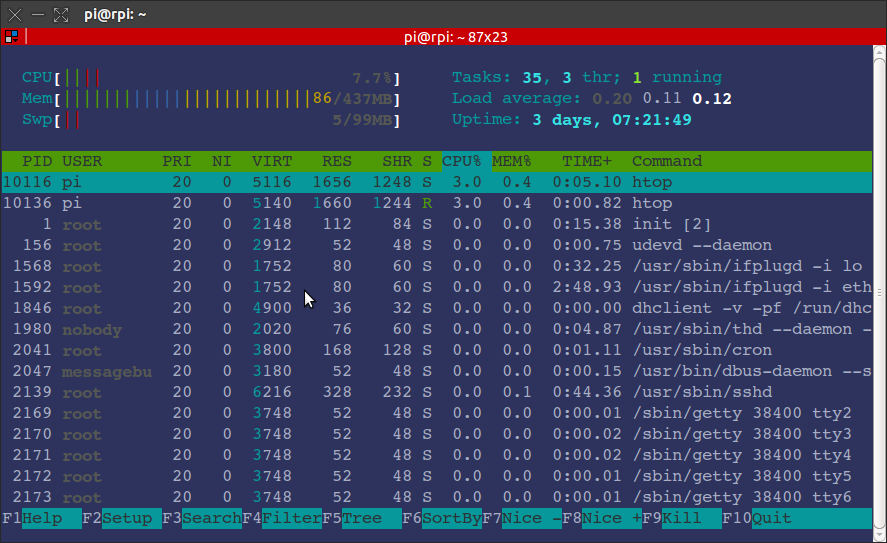
Running htop gives you an overview over the usage of the system resources and the processes running (including their memory consumption and CPU usage).
Running htop might give you an output like this one:
![]()
Table Of Contents
Previous topic
Raspberry Pi for Serious Things